Breeding Call Ducks
| One thing I must say before I start is that if you are reading this and are already using a method that works for you, then DON'T CHANGE IT!! If it ain't broke, don't fix it!! |
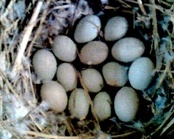
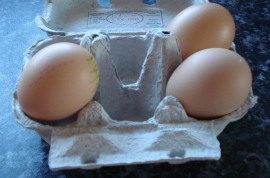
I suppose I should term this 'egg laying and collection' or something like that as I do not intend to discuss Call duck mating and selection, as if I knew all those secrets then I really would be onto a winner! Getting back to breeding… The Call duck is most unlike other domesticated duck breeds in that it lays at almost any time of the day or night. It is the case though that the majority of the eggs are laid in the morning. The eggs should be collected from a well-bedded nest to ensure that they are a. reasonably clean and b. protected from damage or frost. Frost is a problem that I have seen in eggs where the contents expand on freezing and then the shell cracks on thawing. The bedding of the nest must be replaced if it gets wet, or dirty eggs may be a problem. There will be some that are not laid in the nest, whether at the pond or the feeder. This leads to the dilemma of whether 'to clean or not to clean?' |
 |
There are instances when the duck may lay in the mud and this is a problem because the egg is designed to protect the developing embryo. The first line of defence against bacteria is not the shell, it is actually the cuticle, a waxy layer covering the pores that allow gaseous exchange. As the egg cools down the membranes inside contract and can draw in bacteria from the surrounding environment, therefore if the cuticle gets damaged then the hatchability will decrease particularly where eggs are laid on dirty and or wet places. Washing the egg will remove the cuticle and when it dries and cools the membrane will contract. I have never found any benefit from washing eggs, although I do occasionally rub wet eggs to dry them, and I don't set very dirty eggs because I feel the ducklings would likely die of yolk sac infection even if they did hatch. If eggs are to be cleaned, they should be washed in water warmer than the egg with an egg sanitant (anti-bacterial agent) and they should be dried quickly and placed in the incubator. |
Fresh eggs hatch best, but for most of us egg storage is a consideration. At this point instead of launching into a scientific spiel about relative humidity requirements etc. I felt it was best to say what works for me and various others I know, most of whom have success with Calls. Eggs should be stored somewhere cool (although frost free) and out of direct sunlight. Mine are stored in the room next to the garage, but I know someone who stores them in their garage. I also know of others who use sand in outhouses although if rats are around this may not be wise. The big question about storage is 'whether to turn?'
Traditional advice on egg storage dictated that eggs should be stored blunt end upwards. This is the method I adhere to though some research indicated that if eggs are to be stored for a long period they should be alternated between blunt end up and sharp end up to keep the yolk closer to the centre. |
Store eggs on their side, pointed end down in cool area. Turning alternate ways twice daily. |
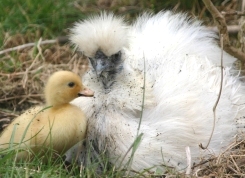
Silkies make ideal foster mothers for incubating and brooding
|
The types of incubation method available for your eggs include both natural and artificial (mechanical) means. The best one for you will depend on factors like:
* Availability - e.g. trying to find a broody in March!
* Cost - incubators can be expensive, although second hand ones can often be purchased for a reasonable price.
* Time - broody's get on with it.
* Strain - this is often overlooked, but I think it is important to note how the birds you have bought (when you start) were bred, as if they were from a line that has been hatched naturally for over 20 years, you may have difficulty in hatching them in an incubator and vice versa. |
Natural Incubation
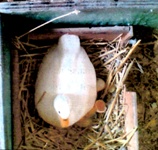
In my opinion, the best method for incubating duck eggs is under their mother or a foster mother. This is not perhaps the best method for rearing, yet good hatchability is often attained this way. Combinations of artificial and natural can be utilised. A broody can be set for a week on eggs and then into an incubator, as the first week is critical. This time leads to the development of the brain and organs etc, and any disruption here will lead to dead in shell before hatching. Hatching with broody hens or ducks may not always be practical. The birds for example, may not make / have a suitable nest; they may not be safe; they may not be reliable etc. one major drawback I personally find with broody calls is that if you don’t watch them, especially with younger birds, they can mistreat the ducklings at hatching time, as can the drakes. |
|
Colourful Calls - DVD & Booklet
Comprehensive practical advice on all aspects of incubation and rearing your ducklings...Click to go to SHOP
|
Mechanical Incubators
Mechanical incubation is a real minefield! My best advice here is read the manufacturers instructions and more importantly get stuck in and have a go! This is the best way to get into it really, as advice is all right, but may not apply to each situation. For example, my 'Polyhatch' incubator / hatcher never used to work very well as a setter and hatcher, yet when I used it just for hatching it worked well.
Whichever method you choose to use, the most important areas to pay close attention to is basically : temperature, turning and humidity. These 3 factors are interlinked with the development of the duckling. One piece of advice I will give at this point is that if you have a method for successfully hatching Calls - DON'T CHANGE IT! I have found that ducklings usually take around 26 days from being set to hatching. Back to Top
|
If you are limited for space, or if your eggs are older or soiled, you may want to remove, at an early stage, any that are not fertile or not going to hatch. The eggs can be checked at 7 days, by shining a light through them thus viewing the contents (a process known as candling). Fertile eggs will have a reddish / orange tinge to the contents, and veins and the heart can be seen on the yolk. The heart can also be often seen beating. Infertile eggs will just appear yellowish with no other signs of growth. These eggs can be compared with a fresh egg when candling if you are unsure. |
You have collected your eggs religiously for the last ten days, the incubator has been running for a week at the correct temperature and now it's time to 'set' your eggs. The calendar is marked not just on the day you set the eggs but also 26 & 28 days later – the days when your little ducks should hatch.
The 28th day arrives, you have a box, food and water waiting under a heat lamp for the new arrivals. |
 |
A simple brooder made up of a wooden box with wire or plastic netting, loosely fitted over the top. Newspaper and woodshavings are used to cover the bottom. A heat lamp is suspended above. Image taken from Colourful Calls DVD and Booklet |
The kids are excited and so are you if the truth be known, but nothing happens. Two more days pass and still nothing. You check the dates, read the incubator instructions again but find nothing.
There are a number of things which could have gone wrong, most of which can be pin pointed without wading through technical bumf of what an egg did or did not contain but by simply 'candling' the eggs.
Candling is the examination of an egg's contents with a light source after incubation has started. The eggs are taken from the incubator at intervals (there are no set rules but the 7th, 14th and 21st day after start of incubation would be ok) and held over a lamp in a darkened room to check what is going on.
What you see can help greatly when problem solving:
Day 7 : The egg:–
1. Has a visible yolk with a network of blood vessels stemming from a central nucleus - is fertile and has a growing embryo - if opened the heart could be seen beating.
2. Is clear there is nothing to be seen other than a light shading which is the yolk and the air space - is infertile.
3. Has a visible yolk encircled by a red ring - was fertile but the embryo has died in the first few days.
4. Has a large irregular shaped dark ring with a small dark blob - the vascular network has disintegrated and the embryo is dead - this has happened on 6ht or 7th day.
Day 14 : The egg:–
5. Has a visibly larger air space at the top, large dark mass and defined blood vessels in centre which are the lungs and kidneys of the growing duckling - contents show movements of live duckling.
6. Has a large irregular mass with no evidence of blood vessels or movement - contains a dead embryo.
Day 21 onwards : The egg:–
7. Has a large air space, very little light can be seen except possibly at the bottom of the egg which is the unabsorbed albumen - has a clear defined line between air space and embryo - contents show sudden movements and should hatch.
8. Contains moving duckling with very little light to be seen and a small air space - seems to be ok but will not hatch due too air space being too small.
9. Shows no movement has a dark mass seen as an irregular band between air space above and light area below which is unabsorbed albumen - contains a dead embryo, late death.
10. Contains a duckling which has broken into the air space and started to break the shell but no movement seen or tapping can be heard if held to the ear - the duckling is dead. Back to Top
|
 |
Approximately 3 days before hatching, the air sac increases in size dramatically. At the same time the air passing through the shell is no longer sufficient to support the rapidly growing embryo and the ducking therefore prepares to hatch.
Movement increases and it begins to absorb the remainder of the yolk through the umbilical cord. The allantoic circulatory system which has been supporting it’s development begins to break down. This increases the level of carbon dioxide in the blood and the muscles begin to twitch.
The twitches allow it to break into the air sac and take its first breath. The pulmonary system now begins to function and over the next 24-48 hours the blood from the allantoic system drains into the duckling and shuts down completely. Breathing in the air sac again increases carbon dioxide and causes further muscle twitches which usually about 24 hours after entering the air sac results in the first crack or 'pip' in the shell.
The duckling will rest again for upto 24 hours while the last of the yolk is absorbed. The final stage may then only take a few hours.
It will begin to turn in the shell cracking in a circle, rather like taking the top of a boiled egg. Once sufficiently broken it will make a great effort, push off the top of the shell and fall out, wet and exhausted. Finally, over the next 4 – 8 hours the duckling will dry out and fluff up.
|
 |
On occasion I have found the need to help a duckling out of the egg. I only do this if I feel that I have made a mistake with the incubation. What I do is to create a small hole in the top of the egg to ensure the duckling can breathe, as if there has been high humidity in the incubation period the moisture content may still be too high and the oxygen level too low. Even with this I would leave them to try and emerge themselves. This can be difficult, however, at that stage as they don't have the same purchase to crack the shell.
One other issue that I have seen at hatching are ducklings trying to emerge from the bottom end of the egg where obviously there is no air space. This is often caused by the egg not being on a level surface as the small end of the egg become elevated higher than the large end (i.e. the yolk floats to the highest point). The humidity level is critical at hatching, to ensure that the membranes around the duckling do not dry out and create a problem. In my Polyhatch I pace a wet towel onto the tray. The advantages of this are that it can be boiled before and after thus leaving it nearly sterile; it gives the birds the required humidity; it also gives them plenty of grip (not like the slippery trays) and keeps all the eggshells together and keeps the hatcher clean. Once the ducklings have hatched, they should be left to dry and gather strength for a few hours (preferably overnight) and then should be moved to a heat lamp ready for rearing.
I hope that some of the above will prove useful and not seem too daunting! My advice though is to give it a go and not to worry. We all lose Calls at or before hatching and that makes those we get to hatch more special I often think. Finally, good luck to you all with whichever method you choose.
Kevin Williamson
Back To Top
|
 |
|
